Let the Beauty of what you Love be what you Do...
~Rumi

Wednesday, March 28, 2012

Lessons in Non-Attachment the Clay Way

I've spoke of these lessons before~ you create, you may grow to love what you create, and then, sometimes... you have to let it go. It's all really very zen if you think about it. I started this Micaceous pot back in early Feb~ a "casserole dish for one." (Sometimes a regular size casserole is just a bit more than you really need!)


My Micaceous Class doesn't start 'til May... but what I am beginning to learn about myself is that my passion for clay knows no bounds, and while taking 2 classes & working certainly is enough... I can't seem to help from working on these pots & making the bears on the side. Which leaves precious little time for the other life stuff... but I digress. Back to the pot. Looks like a chocolate cake, doesn't it?
:)


Things were going along just fine, and I was fairly happy w/ the size & shape of it.


But, with clay, as is with life... timing is everything. I cut the lid before it was time... and as it was drying, it warped & cracked... rendering my lid useless.


But, you know me... I rarely give up (though sometimes perhaps I should!) So I figured I'd try making another lid. 


Now, keep in mind, the pot itself was already fairly dry, so trying to find the right size puki to build my lid in was a bit challenging considering I had to try to accommodate/guess about the shrinkage rate.


This was a good start. I figured I could go back & make repairs & fill in the gaps later to get a good lid fit. (Now that is one thing I love about Micaceous clay- the ability to make such repairs, or add handles, or fill cracks when the clay is in a dry state. You really can't get away with that w/ the commercially processed clays.)


Above, getting ready to add the handle, below the new lid & the original warped & cracked one.


Hmmm... well, I figured I could repair this crack, too... though it was in a risky spot~ at the bottom of the pot near where I had added my first coil.


I figured what the heck... I'll fill it (as I was in the process of doing in the pic above) sand it, polish it, burnish it... it'll be fine. But after speaking w/ my instructor, I found that these particular cracks are persnickety about repairs. They will often show up again as hairline cracks where the repairs are done- after they are fired... or worse, when on the stovetop. Soooooo, after all that work and all that time spent, I must say goodbye to this pot (and dang it~ note the much better lid fit!)


It only took a few minutes to return to the mud from which it started. It'll be recycled & mixed in w/ more clay to have life again as a new pot in the not-too-distant future. I do have one more pot this happened to, but I just couldn't quite throw it into the slop bucket yet! I may try firing it just to see what happens. It's all a learning process either way, so we'll see! And while the Clay will teach you these lessons in non- attachment over & over again... sometimes, well, you just cling to a special piece... not wanting to let go. I'm getting much better with this issue in my wheel throwing class-if it's not going the way I like, I have far less problems w/ recycling it, or if a potentially nice pot turns out crappy because of my glaze experimentations, I can generally let that go as well. I think the time involvement (many hours for one pot) is the reason I become so attached to the Mica Clay Pots, but perhaps in time, I'll learn to let that go, too.
:)

Saturday, March 24, 2012

Quick Trip to Tombstone, Az

Why Tombstone? Well, it's roughly the halfway point in between Santa Fe & San Diego, & mom, grams & I thought it would be fun to meet up for a couple of days while I was on break from class.


 Tombstone was a big silver boom town during the late 1800's, but perhaps most famously noted in history for the Shoot Out at the O.K. Corral, involving Wyatt Earp & his clan. For info on history & tourism, click here.


While the history of the area is quite interesting, the town today is based around tourism and has the feel of a modern day theme park. Most of the old historic buildings are now gift shops & eateries, and there are cowboys on most corners, trying to entice you to go to various "shoot outs," or ride the guided trollies or stage coaches... all for 7- 10 bucks a pop per person.

Streets of Tombstone
At that price, one could go go broke being a tourist in Tombstone! We chose to do only a couple of things~ the stagecoach ride, which gave an interesting narrative of the history of the area, and one Shoot Out... at the O.K. Corral, of course!


After the shoot out, the guys were nice enough to pose w/ all the tourists.
Below~ Doc Holliday, Gram, Mom, Wyatt Earp & his brothers.
:)


O.k., truth be told, we also decided to meet to work on our pots together & just hang out a bit. Mom had a Micaceous pot that was sanded & ready for slip application & polishing, thus needed a demo... here she is working away on her pot at our place in T-stone.


Below, our polished pots ready to be bisqued~ which will hopefully occur some time in June. (I had started the pot on the left waaaay back in Oct of last year, but class ended before I had a chance to finish it! I am also amazed the pot on the right is only mom's 2nd pot- she is a quick study!)


Gramma also brought her violin along to play for us. Pardon the videography... I don't have a video recorder, so I had to use my point & shoot camera to record her playing, but didn't want to miss capturing the moment.


Unfortunately, my camera video function cut off the end of the tune, but it still is quite lovely, & seemed fitting to the background of the Wild West.
:)
Oh, p.s.~ if you should decide to visit Tombstone, we found a quite lovely little place to stay @ the Lucky Cuss Cottages- for 99 bucks a night, you get a quaint little 2 bedroom cottage with a full kitchen... it suited our needs perfectly, and had much more charm than a motel room!

Monday, March 19, 2012

Clay Updates...

Well, I'm officially on spring break for the semester... and I have to admit, it's nice to have a little down time.  Here's a little bit of what I've been up to in my clay classes~ last week in glaze calc we did tests via Triaxials, vs. the line blends we had been doing up until this point.


You start by mixing up a base glaze (I chose Satin Mint Green~ which in the glaze books looks a very pale green w/ some light caramel undertones~ I'm hoping to make a nice glaze for some projects I'm working on...) then you divide the glaze into 3 buckets- A, B, & C. A is your base glaze, and to C & B buckets, you add a percentage of other colors.


You then measure out in various percentages from each bucket to create 21 different variations & dip the tiles to test. Exciting stuff, no? 
Looking forward to seeing the results once they're fired, which should be some time next week.


Also still working on my throwing skills! Inconsistent, yes, but perhaps a bit better.


Trimming bowls, throwing cylinders, putting handles on mugs.
Also got about 6 pieces out of the kiln last week. About 1/2 were total junkers... but these combos I found interesting.


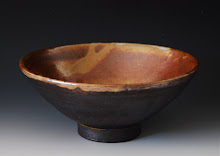
While the bowl itself is nothing special, I do love it as I used some of the glazes we mixed in glaze calc class on this one. It was from the "slop buckets," which are basically leftovers from our tests... but I had to try it on an actual piece, rather than just looking at test tiles. Kinda cool.


This one was from standard glazes we use in class. The dip on this one was a little sloppy, but I like the color combo, and I have to admit that the "sloppiness" of the piece is growing on me as I use it.
:)


This one is funny- it's not quite a plate, & not quite a bowl... I call it a "plowl." Ha ha! Experimenting w/ dipping & sponging on glaze to form a pattern, I thought this one turned out alright.

And, last but not least... the bears! It was crazy windy & blustery yesterday- too yucky to go out for a hike, so I stayed in & made bears most of the day. I do love making those little guys. :) In other clay news, the big bear made it out of the kiln intact (Yay!) & hopefully I'll get it glazed here in the next few weeks, depending on how the glaze testing goes. But in the meantime, I think I'll be taking a little well deserved clay break.
:)

Tuesday, March 6, 2012

Where the Magic Happens...


In the kiln of course! This is a pic from loading the gas kiln last week~ note all our little test tiles from Glaze Calc Class.
:)


The test tiles above are all from the same base glaze (far left,) with various percentages of Alumina (stabilizer) added. It's interesting to see how little variations can totally change the effect of the glaze.


Everyone in class is testing different variations & percentages of colors, fluxes & stabilizers added to one of 3 favorite glaze bases that we formulated earlier in the semester. It's a lot of info to take in & talk about. We spent hours talking about the results.


Still working away in wheel throwing... filling up shelves. Thinking how taking 2 classes & working is a bit much...


generally feeling a bit behind & trying to get in the studio during my free time, though open studio hours conflict w/ my work schedule! The good news is, I'm gradually getting some things done & getting a little finished work back. Most of it was just testing glazes on the recycled clay that I'm using this semester. Some turned out just horrible! You don't get to see those~ but here are some results that I can live with.
:)


I splurged & got a sheet of background paper for photographing finished work. Surprisingly, I couldn't find it anywhere in town, but I did find it online- it was over 40 bucks w/ shipping! Also, finally got my good camera back, thank goodness! That was over 200 bucks- another unexpected expense! Such is life... you all know how that goes.
Well, gotta run... studying The Complete Guide to High Fire Glazes to pick a glaze to test on Wednesday & gotta get in the studio to do a bit of glazing for my wheel class before the next firing!
:)