Let the Beauty of what you Love be what you Do...
~Rumi

Thursday, March 31, 2011

Bear/Cityscape Results

Remember that architectural assignment I did waaaaay back in February? (click here.)Finally~ the long awaited results!


I have mixed feelings about it. It was a success in that it didn't blow up in the kiln, and I do like the concept behind it, and quite enjoy the shape of the forms. But, we are doing low fire for this class, and the low fire glazes that are available to us I am not super-duper crazy about. I do think the bright colors make it appear a bit more whimsical, but I also feel it gives it an adolescent feel.(Whereas some of my pieces I adore, & have about the house, this seems more appropriate for a children's room.) I tend to prefer a bit more natural color, and it makes me wonder how I'll go about glazing my next project. I guess in part, that's why we take classes, to find out what works & what doesn't... what we like & what we don't. I may however, revisit the concept again at a later date.
:)

Saturday, March 26, 2011

One Finished Piece & More "Magic Clay" Testing


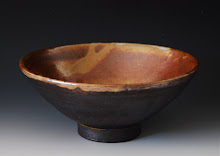
Finally! A finished, fired, glazed piece! I was quite happy with the way it turned out, though it's not very large, perhaps 4 inches tall & 6 inches long. I used a clear glaze on a white stoneware clay body. Though I got it back right before spring break, I'm just getting around to posting... as I have been working a ton this week! In the evenings, I have been trying to muster up a bit of creative energy to work on further Magic Clay testing. I would say it's highly likely this next piece blows, as I believe I was pushing the boundaries a bit in terms of what I think this clay can do.
Day 1:
Rolling out tubes (which will be legs & body)
& letting them dry. 


Day 2:
Moisten dry body, slip & score, add more clay...


& add the legs.


All legs attached, now we have a loose bear form.


Scoring the form for addition of more clay.


Day 3:
Adding more clay to try to shape the bear. At this point in the process, I could see it would have been more helpful to have started w/ more than random hollow tubes & given more thought to the final form. It's legs were too long & the body a bit short. 


Day 4:
Finishing up. It is in times like these that I have some serious envy of those of you that actually have studios! (Or homes, or garages, or space!)My impromptu "studio" set up in my apt takes up about a 3rd of my tiny living room space!(And makes for some serious clean-up afterwards!)


The semi-finished bear. I definitely could've kept going on this piece... but I had already added so much clay, and I could tell I wasn't going to get it to look the way I wanted due to my lack of pre-planning.


Plus, supposedly, you are able to go from dry clay to wet, (if you moisten, slip & score) which you cannot do w/ "normal clay," but I have some serious doubts to whether this will actually work & really didn't want to spend much more time on it if the chances are high that it won't work!


So, we'll see what happens. It'll likely take weeks to find out, so I guess I'll just have to start another project...
:)


Saturday, March 19, 2011

Magic Clay & New Assignments

A friend of mine had recommended to me a paper-embedded clay called Akio that is supposed to be great for larger sculptural works... apparently you can build thicker walls, & experience less cracking, which would be awesome. Problem is, I couldn't find it here. And to pay for shipping from the Pac Northwest... well, that wouldn't be cost effective!


But, as luck would have it, they had a similar product called "magic clay" @ NM Clay in Albuquerque. It's a fiber embedded clay that is supposed to have those same magical qualities: less cracking, more forgiving AND supposedly you can build wet to dry... thus you don't have to worry as much about keeping the clay at a uniform moisture level, which I had some difficulties with on the previous larger works I attempted. I peeled off a strip so you could see the fibers. What a trip, huh? It's like furry clay! :) When the clay is fired, the tiny fibers burn away, leaving just the clay body behind.


Well, I had really been wanting to try this new clay, but had been busy w/ other class assignments (w/another clay body) & life in general, so it has been sitting & waiting. We were given our new assignment (loosely based on the concept "inside out- outside in") so i decided to try this magic clay w/ one of my 2 ideas. I wanted to incorporate the bear in this project, and when I was out hiking the other day, an idea came about making a woman emerging from a bear form. Now, I thought this was an original idea, but it also felt very familiar. A woman in class & I had been talking... a conversation originating from my previous bear projects, about how she had heard that if a bear was skinned, it looked very similar to a human form. I thought the idea I had was perhaps related to that conversation... a relationship between human & animal form, and incorporating the concept of bringing the inside (human form) out. But here's an interesting thing about making art- we are very often influenced consciously or unconsciously by other artists. After several days of thinking, I looked up some Kiki Smith images and found very similar subject matter. But I wanted to go with it, because I did like the idea,  & I've never tried to sculpt the human form. Oh, Geesh, here's some of my sketches so you get the general idea of where I was heading.


Below, building a rough human-like form. Behind it are the bear legs, but I couldn't get it to look quite right, so had to improvise from the original sketches.


Addition of head, arms & bear head, which is hollow & hangs off the side. If you're wondering what that thing is hanging of the left arm, it's supposed to be bear skin ( c'mon, use your imagination!) And the left leg... well it blends into a bear's hind foot, of course!


Addition of hair & attempting to sculpt the body a bit.


The semi- finished piece below.


It's very rough,amateurish, and of course featureless (I need to take a class on sculpting features!) but there's something about it I really like. I think it's actually the "unfinished" look it has to it... the way the woman's legs are not complete, as if she's rising up. Plus, it's a starting point, as well as a test of the Magic Clay. 

Tuesday, March 15, 2011

For Japan...

Sending Wishes of Love, Compassion & Healing


In the wake of the Natural Disaster of the 8.9 Earthquake, and subsequent Tsunami that have struck Japan, as well as the ongoing threat of Nuclear Meltdown... my heart goes out to the people of Japan. The loss, the destruction, the terror are almost unimaginable. Here I sit far away in America, wondering what in the world could I possibly do to help? The only thing that I could think of, besides sending thoughts & prayers, was to donate money to an organization that has the power to really make a difference. And I think they really need support at a time like this. At first my thought was: but yeah, how is my few dollars going to help? Then I started thinking about how much could I give. Well, I figure I could do about one hundred bucks on my student budget. Still, what difference would that make, really? BUT!!! Then I started thinking about the population of the country that I live in. Now, yes, we are in tough economic times... but unless you have lost your job, I figure almost everyone could spare as little as 5 bucks (or 10, or ???) Now if you multiplied that 5 bucks (or 10, or ???) by 300 million (roughly our population) or so... now, that has the potential to make  a HUGE difference! I've put together a little list of reputable organizations... just click on the links below. I've decided to go w/ Mercy Corps. There is also a list of artists below that are donating their work for sale/auction w/ the Proceeds going to Non-profits to assist Japan in their time of need. Please consider helping if you have not already.

Mercy Corps: (be the change.)
https://www.mercycorps.org/donate/japan?source=55400&gclid=CNzNuKOU0qcCFcpQ2godCnxl_Q

Habitat for Humanity:
https://www.habitat.org/cd/giving/one/donate.aspx?link=353

Red Cross:
http://www.redcross.org/portal/site/en/menuitem.1a019a978f421296e81ec89e43181aa0/?vgnextoid=

Salvation Army:
http://salvationarmyusa.org/usn/www_usn_2.nsf


Artists Donating works for Sale/Auction for Japan:


https://www.facebook.com/handmadeforjapanauction?sk=wall

http://burntnormal.blogspot.com/2011/03/contribution-to-japan.html

http://elizabethavedon.blogspot.com/2011/03/life-support-japan-auction.html

This is obviously just a small list & there are many more to be found. I was just hoping to present some ideas on how a little gesture can make a big difference. Thanks for reading & considering, and 

Please, pass it on!

♡♡♡

"You can do no Great Things... only Small Things w/ Great Love."
                      ~Mother Teresa

Friday, March 11, 2011

Clay Class Assignments: Functional & Non- Functional Cups & Use of Slips

Good Golly! Six weeks later and I am finally seeing results from class! The slow pace has been a bit hard for me to take... and I admit I have lost a bit of motivation for creating when I see the work sitting on shelves for weeks. Anyhow, our very first assignment (6 long weeks ago!) was to hand build functional & non-functional cups & the application of slips. On the one below, my idea was to create a fragile & whimsical cup. The clay body was covered w/ a fine white slip then bisque fired, coated w/ clear glaze & fired again. I thought it turned out pretty cute.
:)


Below is it's non- functional counterpart. I used the same whimsical design, but created a bullet hole through it to suggest the fragility of life. (Just as a cup is a vessel... so is our body... and it only takes one act of violence, or one thing to "go wrong" to render it non-functional.) 


I think the concept came across well in the piece. Below is another functional cup. I wasn't so happy w/ the "final product," but it was a good experimentation in the use of colored slips. The clay body is white, a black slip is applied, then either carved into to show the clay body beneath, or further painted w/ a white slip. I did a little of both.


I wanted to put something I love into the cup... so I added mountains, a full moon... and well, let's face it, who would not want to wake up & drink a "cup of joy" every morning?!


But when I took it home, I realized I just can't drink out of a black cup~ can't really see your liquid level & I prefer lighter colors for drinking & eating. I'll use it to put my glaze brushes in. 
:)
Below is probably my favorite piece. Inspired by the design of the first functional & non-functional cups, I made this little vase... but added a bit more "movement" to it.


It's about 4 inches tall & would be perfect for some spring wildflowers once they arrive! I've been experimenting w/ different sizes & shapes of the same sort of design and they are quite enjoyable to make. We're also in the process of learning how to mix our own engobes (like an underglaze) so that is pretty exciting.  In fact, I'm off to throw some test pieces in the Kiln... hoping to get a rich black like in the mug above to use for my "oil spill" in my Polar bear city piece.
Happy Weekend, Everyone!
:)


Friday, March 4, 2011

Fixing What's Broken


Well, my big cartoon bear didn't make it through the bisque fire. Interesting though, the way the chunk of him popped off. I expected perhaps he'd crack or something... rather than lose a chunk. When I opened the kiln, there it was... a chunk just lying there... all nondramatic-like! I did feel my heart sink... but it was for only a brief moment...this is just what happens in the clay game when you're learning. (Not to mention when you're trying out new clays,& trying to go bigger than you have the skill level for!)


When I built him, I recall having to add clay to the inside in certain areas where the slabs felt too thin. It looks as though I trapped some air or moisture in between the two slabs... and my slipping & scoring looks poor upon examination. I couldn't see giving him the heave-ho, just because I can't glaze & fire... so I decided to patch him up. 


I used a little E-600 industrial strength glue to put him back together, then a little outdoor paint. 


You can still see the outline of the crack on the top, but that honestly doesn't bother me. I may or may not add a bit more texture, but definitely he'll need some sealant to finish him off. Now, if I just had a yard & a garden, I'd put him in it!