Let the Beauty of what you Love be what you Do...
~Rumi

Tuesday, October 26, 2010

Creeksicles & More! Out & About in the Pecos Wilderness

I tend to make up my own words... one of my friends calls them Becky-isms. It turns out though, that there are others that use this term (I googled it...) but I couldn't find it in the dictionary. I was enthralled by these creeksicles I found today hiking along the Rio Medio in the Pecos Wilderness.


I thought the one below looked like an Angel. Or the letter "A."
Or both.
:)


I also found this sculpture... it reminded me of Andy Goldworthy's work. It was interesting though, 'cause in 5 hours on the trail... we did not see another soul. I wondered who did it & when? 


Remnants of Fall Color... mostly all on the ground now...


Afternoon sunlight backlighting the trees...


and a treat on the drive home~ gorgeous New Mexico Skies!


And a quintessential New Mexico Sunset!


It felt good to get back out on the trail again, out in the sunshine & crisp weather, & goof around with my camera!
:)


Saturday, October 23, 2010

Season Finale of "Clay Days"

    “I do think a  man has missed a very deep feeling of satisfaction if he has never created or at least completed something with his own  two hands

    -One man’s wilderness, an Alaskan odyssey…(from  the journals of Richard Proenneke) 

A quote my Mom emailed me... and quite appropriate, I believe, for the Season Finale! Clay Days have officially come to an end. You'd think I'd be sad... but actually I'm a little excited to have a bit more free time next week to get out & enjoy the great outdoors as fall is shifting towards winter. Here are the gorgeous bisqued pots, piled & ready to fire~


Remember how smoky that first pot turned out? Well the key it turns out, is to elevate the pots on racks, rather than use pallets as we did the first time. The pallets burn down, and the pots sit too long in the smoldering ash, which gives that super smoky look. Here's all the pots on racks & ready to go!


Again hesitant about getting too smoky a pot, I only put small pieces of Ponderosa Pine bark directly on my pots... then the firing is done the same as last time... wood is piled up to form a tent around the pots and then lit on fire~


After it burns awhile, the pots begin to emerge.


And, after many weeks of work... the pots are finished!
Below is the Charlie Brown Pot~
Still not my favorite, but not so Charlie Brown looking any more.
:)


My pride & joy below... the last big pot that I completed~


And, a tie for my favorite pot below... formerly known as the "Genie pot," I now call it Felipe's Pot (since it was made from Felipe's Clay.)
:)


Being so hesitant about getting too smoky a pot, I went in the other direction this time & feel a bit more of a smoke cloud would've done this pot more justice. But hey, I'm learning... and now have more of a sense of what to do next time I have the chance to work with Micaceous Clay.
:)


And, last but not least... my little Pumpkin Pot! This one was made with Felipe's Clay... and also at the very end of the session, so the craftmanship could have been just a bit better, though I do think it is awfully cute! It's a small pot that fits perfectly in my hand.
:)


My instructor thought it might make a good garlic roaster... hmmmm...


I did get back a little work from throwing on the wheel at the beginning of class, but not having the time to do glaze tests... the results were less than adequate, and really not worth posting, though I do have a few things left to be fired... so we'll see. But for now, I'm ok with this, as I simply didn't have the time to do it all... and am actually quite happy with what I did get done, considering the full time job & all. And I learned so much about working with Micaceous Clay in the traditional manner that stretches back generations... before there were such things as wheels & glazes!
Happy Fall, Everyone!
:)


Wednesday, October 20, 2010

Aaaaah... Fall Color!


In between work & "clay days," I haven't had time for much else! I hadn't been up on the mountain for a few weeks, but I'd been watching the progression of fall color from town and I knew if I didn't get up there soon, I'd miss it until next year. So after the Pit fire today, rather than come home & take pics of my pots... up the mountain I went! It was absolutely gorgeous! I've said it before, but nature's beauty never ceases to amaze me!
:)
...Stay tuned for Wednesday is Clay Day~ The Season Finale!
Coming Soon!
(it was rainy by the time I got home & couldn't get any good pics of my pots!)
:)

Sunday, October 17, 2010

The Last BIG Pot!

I had mentioned in a previous post that I was working on 2 pots concurrently... the Pot from Felipe's Clay and this one that I finished last week & am just getting around to posting! I'm really pleased with the way it turned out! It's about same size as my first Micaceous Pot~ pretty big! This represents roughly 10 to 12 hours of work~


Of course I've got to show a little process... it's what I do!
:)


The first step in building a large pot is rolling out the clay (just like rolling out dough) and placing it in a puki (a shallow ceramic form which helps hold the the shape & prevents your pot from collapsing.)


After smoothing it consistently in the puki, you add your first coil....


...and another, and another, and so on. It looks pretty rough at this stage, but if you smooth, paddle & shape it for long enough, it will begin to look like this~


At this point, I am truly amazed it starts to look like an actual Pot! Being new to the coiling method, it still boggles my mind sometimes... the transition from slab & coil to Pot... and the fact that it all stay together! 


The addition of the fluted rim...


And Handles!


And...Whala!
(After all the scraping, sanding & slip applying and burnishing)
The finished Pot!


Good news is, all the pots have made it through the bisque kiln, and we'll do the final pit fire on Wednesday... pretty exciting stuff! I've got a few other things I'm working on, and still some glazing to do on things I started over a month ago... so I may post those somewhere along the way... but these pots have been my main focus these past 7 weeks. And though I may complain from time to time (o.k, maybe a lot) about working too much & not having enough time to create, I am truly grateful for the time that I have had to learn this process!
:)

Tuesday, October 12, 2010

Wednesday is Clay Day... Part 5~ My Special Pot!

I'm getting my "Clay Day" post out early, 'cause I'll have a long day at the studio on Wednesday as it's my last day to do actual work before the final firing next week. This particular pot is really special to me, because the clay is not a commercial micaceous clay from a big clay company, but clay right from the mountains of Northern New Mexico. (Ever since I started doing clay work, it has been a dream of mine to find my own clay... so this is the next best thing!) On a tip from our instructor, one of the gals from class drove up to purchase clay from Felipe Ortega, a very well known Micaceous Clay Potter here in Northern New Mexico. If you want to check out the work of a true Artist, check out his web page here~
I found this clay a bit more challenging to work with... I experienced more cracking and it didn't seem as smooth to sand & so forth... the commercial clay has likely been processed in such a way that it has more plasticity and is of a finer grain or something. Working with the traditional clay felt a bit like when I was a kid building mud pies...
:)
 So here's the building & finishing of my special pot in various stages. (Whereas my last one was the Charlie Brown pot... this one made me think of a Genie Pot... though I sanded & buffed it for what seemed like a very long time... no one appeared to grant my 3 wishes!)

I got a little "photography happy" shooting the finished pot! I just find it interesting how different it looks from different angles, in different settings and with different lighting. Creating pottery is such a Zen activity... it's a lesson in non-attachment, because so many things can go wrong at so many different stages. But, I have officially broke the potter's rule of not getting attached to your work. I love this pot... mainly I think, because it's right from the mountains of Northern New Mexico.
:)


Wednesday, October 6, 2010

Wednesday is Clay Day... Part 4

Well, truth be told... pretty much all my days off for the past 2 weeks have been clay days. Which is great, but then other things that you need to do on a daily basis don't get done. You know, thing like running errands, going grocery shopping, cooking a decent meal... those sorts of things. You see, I only have a couple short weeks left until my class ends and when it does, so does my access to the studio. Sooooooo, this is why on any given day, my kitchen table looks like this!


 I was playing around w/ slab work. My very loose template was the vase on the left... but I wanted to make it a little more "flowy," & came up with this~


It has the potential to look quite cool once it's glazed! And do you remember my little bear from "Days off are the Best," many posts ago? 
Well, I made another one, though a smaller version~


And I finally got back the original from the other post!
Here he is glazed~ I call him my good energy bear... 'cause he really is chock full of good energy!
:)


And here they are together, so you get the idea of size~


And now back to the Micaceous Clay! Well, those of you who have been following my blog since I was taking classes up in Oregon know that I love to document process, and am rather intrigued by it. But dang it... I forgot to take pictures as I was making this pot! To give you an idea... I'm showing some of the scraping & sanding that goes on to reach the finished product. Pretty exciting stuff, eh?


Here I am scraping the inside of the pot. This one was a lot smaller than my first one, and my first closed form (has a lid) pot ever. Since it was small, I felt the walls should be thin... and in order to get nice thin walls from where I started, a lot of scraping was necessary. This was actually a lot of fun! I sat out on my front porch in the sunshine in my PJ's with an endless cup of coffee... my kinda day! :) Below is the pot after the scraping, but before the sanding.


My feelings about this pot are fairly neutral. I don't absolutely love it, except in an I made it so I gotta love it, kinda way but I don't dislike it either. I do have to say this though, doesn't it kinda remind you of Charlie Brown's head?
Seriously... I didn't mean for it to come out that way, but it is kinda shaped that way, is it not?! Then on to the sanding... will this excitement ever end???


... and more sanding~


And finally, after applying 3 coats of micaceous slip, and hand burnishing w/ stones
(oops! forgot to take pictures of that~ suffice it to say it is a long and lengthy process!)
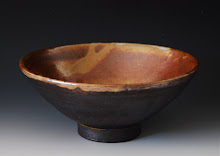
My finished pot... sparkling in the morning sun!


Whew! That was a lot of work! Now again comes the wait for the firing & the anticipation of whether it will make it through, and how the look will transform if it does. In the meantime, I finally got some glazing done on some cups & bowls I threw on the wheel weeks ago, and I'm concurrently working on 2 more Micaceous Pots... another small closed form & another big one like my first~ but they've just been placed under wraps for now... as I go back to those crazy 10 hour shifts at work. It's funny, 'cause I get tired after 8 hours in the studio... so imagine how I feel after a 10 hour work day! 
Can anyone say "Couch Potato?"
Until next week...
:)