I am not generally one to add abstract designs to my pots, but for whatever reason, on this particular day, I decided to give it a go. I have to admit, I was not happy with it at first & I was sooooo tempted to recycle it when it was in it's wet state, but a few people in class said some things that made me decide to keep it.

I cut the lid just after the photo above, and the pot began it's drying process.

Unfortunately, this is what happened as it dried~ the lid & pot dried in different directions.

I don't know why this happens exactly, but I find when I make lidded pots w/ the Micaceous Clay, the lids tend to warp. It doesn't happen every time, but I'd say with me, it happens about 1/2 the time. I've tried drying the lid with the pot, drying the lid upside down with support, and then a combination of the two. I think it is just the unpredictability of working with real, honest to goodness natural, directly "of the earth" clay. Or maybe it's just me! But I digress. This presented a challenge, and it seems I am always up for one (ha ha) so I figured I'd give it a go at repairing it.

That is one thing I love about working with Micaceous Clay... you can do repairs when it is bone dry... something you cannot easily do with commercially processed "regular" clays. It is, however, a rather tedious process. I started with water scraping & sanding down the high points. Then I began the slow process of rebuilding the rim by wetting the pot & very gradually adding more clay. You can only add a teeny bit at a time, then you must let it dry, and repeat this step over & over until it comes close to fitting.

Then you must sand, adjust, add more clay if needed. I worked on this pot little by little over the course of several weeks.

Here it is after all that work~ all sanded & ready to polish. The lid fit was not quite perfect (I am a stickler for the perfect lid fit!) but pretty close. I figured it was as close as I was going to get.

Polished pot with a fine Micaceous Slip. At this point it went into the bisque & awaited the final firing. I knew with this pot, I would want to do Raku for the 2nd firing, and as luck would have it, we did 2 Raku firings on the last day of class! Yay!
Below are the results.
:)
 |
| "Evolution Pot" Hand dug Micaceous Clay Hand Coiled, Sculpted, Scraped, Sanded, Polished. Low Fire Bisque/Raku/Reduced |
 |
| *Double Click on any Photo for greater detail :) |


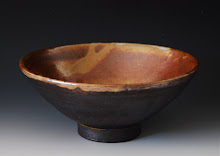
I've included many angles, as I do, to show the delicious effects of the Raku firing on Micaceous Clay. I'm in love with Raku & reducing pots... I find the effects to be simply wonderful! The lid did warp just the tiniest bit during the final firing... just enough so that again the lid does not fit just perfectly. But with clay, just as with life, things aren't alway perfect... & sometimes those little imperfections are what make life more interesting.
:)
** We just finished firing the rest of our Micaceous Pots this weekend... I'll post the results just as soon as I have time to photograph them properly!


5 comments:
Wonderful, Becky!
I am fascinated about your work! My best regards from Romania!
What a curvy beauty. I'm glad you persisted. Do you put a signature "mark" on your creations, Becky? (It's the school teacher in me asking.) And- what about the BEAST? PS Enjoy the last warm days of your fall.
Wow - what an interesting looking pot! You are a very tenacious potter! I like your step-by-step directions and photos. They sure help with your explaining process.
You've come a long way!! This pot is so very unique!
John
Hi Becky,
This pot is a masterpiece!!! Well done! I am so impressed. xoxo
Post a Comment