Let the Beauty of what you Love be what you Do...
~Rumi
Showing posts with label printmaking. Show all posts

Monday, May 31, 2010

The Eleventh Hour


Wikipedia describes The Eleventh Hour as  a colloquial expression meaning  "a time that is nearly too late."  A perfect title for my Final Print... as that's when I got it finished! I was experiencing a few setbacks late in the quarter in terms of consistency & results... but through much diligent effort & persistence, I pulled off this Final Print the day before our final portfolios were due. Turns out, it was one of my favorite prints of the quarter! I feel it retains a bit of the photographic quality that I like, but also enhances the textural elements and detail found by utilizing various printmaking techniques. (The final print is actually sharper than what appears here.)


A closer view... I had fun trying out different colored inks & papers on this plate to create slightly different feels.


This was the original image I took last summer of the window of San MIguel Chapel in Santa Fe, New Mexico. Of the many photographs I took of this church, this was one of my favorites... and made for a wonderful template for my explorations in photo etching.
:)

Sunday, May 30, 2010

Altering the Image

Now that the quarter is coming to a close, I finally have the chance to update my blog! I've had fairly equal parts of frustration & delight in this class. I've found that when I get consistent results, and come up with an image that I like... I really don't want to mess with it. But, for our classwork... it was all about messing with it! Here are some examples~


Above is the original photographic image that I took of the church at Acoma Pueblo in New Mexico. And below, the image etched onto a copper plate & printed~


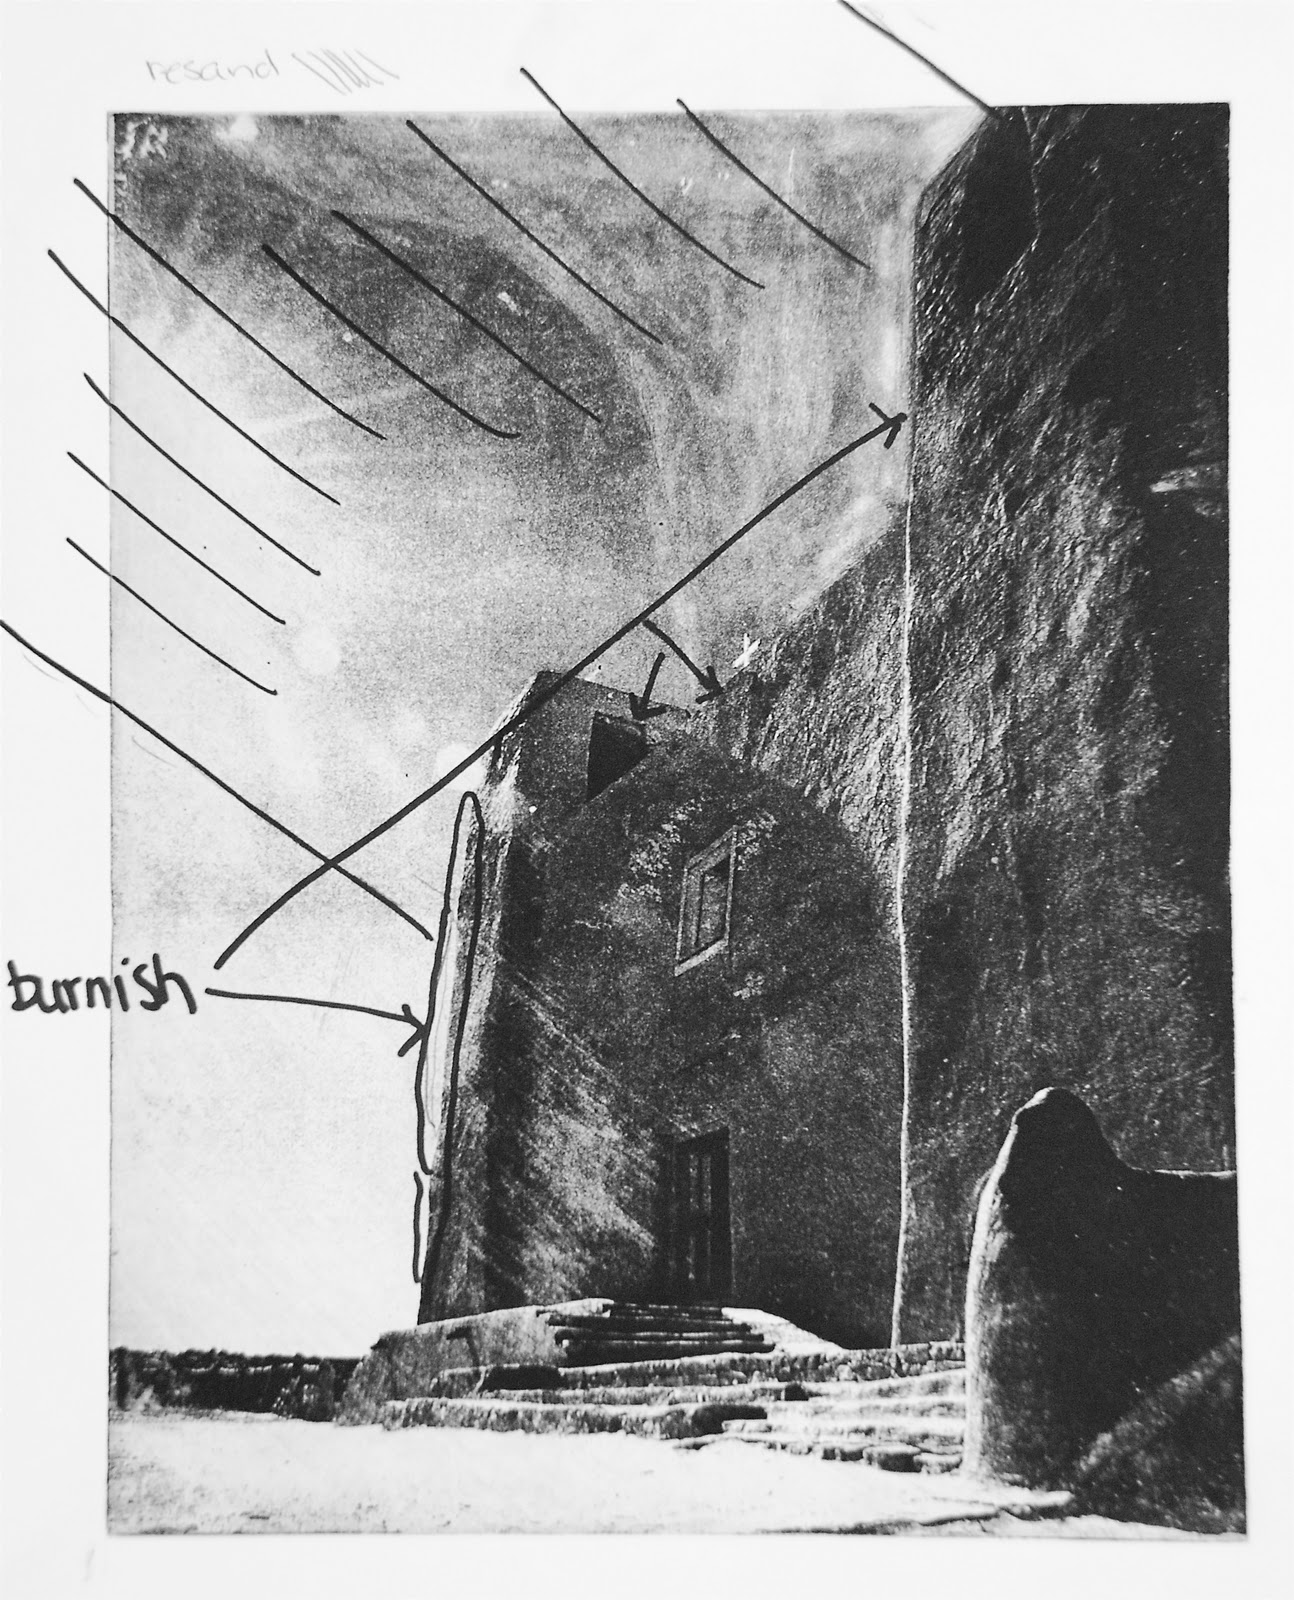
I liked this one (the first etching,) but our assignment was to add text, and in order to do that I needed to lighten the sky... which means I needed to go back in & scrape the plate to try to remove part of the etch~


Then, for the addition of text... new film is applied & re-etched/aquatinted, after a hardground is applied to the church & sky to protect the original image from etching into darkness as well. For my text, I borrowed a line from John Lennon's Imagine~


After all that work... I like the first etching the best!! This is part of the frustration of taking classes for grades. What makes me happy is not necessarily what makes my instructor happy. And while my primary goal is to learn, and come up with something I like... well, I also like my grade to reflect my efforts. And for me, that usually equals putting in much more time than most of my fellow students. So be it, then. Here's one more example of an altered plate~


Above, one of my earlier results from a previous post... and below, the plate after it has been altered to add a stormy sky and a bit more detail to the structure.


I got lucky on this one, because I actually like both the unaltered & the altered print!
:)
Coming soon... the FINAL PRINT!


Printmaking/Photo Etching~ Setting up a Tableau


For one of our final prints, our assignment was to set up a tableau consistent with our body of work, mine being the old adobe churches of New Mexico. Here's the set up~


One of the many photos taken to create the idea I was looking for~


The first two copper plates were total failures, but on the third, I had enough to work with that I could rework the plate by further hardground applications, use of the needle tool to "draw" in fine lines, and "spit bite" techniques. Here's the resulting print~


I still find it odd that I was having excellent results with some of the earlier images, but had lots of trouble with the Photo Etching late in the quarter. The lack of consistency was frustrating! However, it did give me the opportunity to keep at it... working & reworking plates until I came up with something. This print went over well during critiques... so it wasn't a total loss!

Thursday, May 27, 2010

You Never Know Until You Try...

Looooooong and late hours have been spent in the print studio... I've been up working far past my bedtime and I have simply been too tired to blog! It is just a tad frustrating, too... when desired results are far from being achieved. Long story short, for our final prints, all our images had to be altered in some fashion so as not too look too photographic... so I found myself spending MANY hours working & reworking plates. Here's the first print from an earlier post~


In order to "save" part of the image, a hard ground substance is carefully applied to the copper plate & allowed to dry~


Then, I went through the whole aquatint process again and added the moon with applications of ground & aquatint in between etchings~


At first, I thought it turned out pretty cool... and was rather happy with it. But, it didn't get the most rave reviews during critiques... even though I didn't see anyone else really pushing the boundaries of alteration. My instructor felt it would be better without the moon, and just a solid black sky. So, I reworked the plate again, & got this~


You can't really tell, but in the print there was still a faint outline of where the moon was... and I didn't like it. I tried making a brand new plate at this point, but the etching acid was weak, and the entire plate was scrapped. Boo Hoo! So, I went back to the original plate & reworked (burnish, scrape, sand, hardground, re-etch.) By this time the acid was REALLY weak. Normally you get a decent etch in 25 minutes... I left the plate in the acid for 4 hours after reworking it! After all that work... this is what I came up with~


All that effort... and this print won't even go in the final portfolio! But, it's true... you never know until you try.

Monday, May 10, 2010

Photo Etching the Churches of New Mexico

I have had yet another busy week! Between the Print & Ceramics studio, I've logged over 50 hours this week. Which, of course doesn't include time at home spent researching, editing photos for projects, and writing papers! But, I am determined to squeeze every ounce of learning in that I can, and while I feel I am sorely lacking balance in my life, I only have a couple more short weeks to wrap up projects! Here are the results from my latest two plates~


I was absolutely thrilled with this print! I just LOVE IT!! For some reason, I can't get the "add a caption" feature to work on Blogger today, so I will just tell you~ this is the San Francisco de Asis Church in Rancho de Taos, New Mexico. It is such a beautiful church, and Artists of all types have long been drawn to photograph & paint it... including Georgia O'Keefe, Ansel Adams... and ME! Below is the original photograph~


I spent a bit more time on this one in photoshop before printing out the transparency, dodging & burning to bring out the highlights & shadows, with the goal of achieving a more contrasted final print.


And because I can't help but show a bit of process...  as it absolutely fascinates me~
below is an example of an original copper plate (top) and one that has been painstakingly hand sanded~


Look at that copper shine! Once you've got a good transparency, and the plate is prepped, the light sensitive film is applied & you are ready to expose!


The image was exposed for about 12 minutes, then into the developing bath it goes!


In order to tell when it is developed properly, a keen eye & loupe are used to make sure the film is "opening up." It can be quite tricky! Then into the ferric chloride (acid) for etching!


I know, you are wondering... does this excitement ever end?! Not just yet!!!
After the initial etch shown above, it must be aquatinted & etched at least two more times!
Below, an example of aquatinting from last quarter~


The plate is sprayed very lightly with a water based latex & then etched again, which results in more tonal ranges. After all that, you are free to clean your plate & get ready to print! It can be an all day process from start to finish just to get one good print!! But, if you're lucky... you'll get something you like, and once you've got that plate finished... it's only about 20 minutes or so to ink, wipe & print.
Below is the resulting image from another plate that I did, but I didn't have as good of results with the development process. This lovely little church is in Golden, New Mexico.


The white smudgy areas are where the film did not "open up" during the developing process. It's a tricky process to get all the areas to open evenly, I'm tellin' ya... which is why I was so absolutely thrilled with the first print! While I love the look of etched photographs... all our final images for class must be altered, so as not to look so Photographic! LOTS to learn in 8 short weeks!!
:)

Friday, May 7, 2010

Photo Etching~ Mission Church, Las Trampas, New Mexico

Now that I've finished most of my testing for photo etching, I'm getting started on working on my "Body of Work" for my final portfolio. My tests were all 4x6, but I've moved up to 8x10's for these prints. I'm basing my imagery on Photographs that I took in 2008-2009 while living in Northern New Mexico. I love these old adobe churches, and am drawn to their earthy elements, textured surfaces and soft organic lines.

San Jose de Gracia de Las Trampas


Although this class is beyond time consuming, I am fascinated by the process. One of the most exciting parts is watching the film develop on the copper plate. The photo above shows the plate after it has been exposed and etched, but before the blue film has been removed and cleaned for printing.


And...  of course, the original image!
:)

Monday, May 3, 2010

Dad's Self Portrait Meets Photo Etching

I'm really enjoying learning this process of photo etching. It is, at times frustrating... and most certainly time consuming, and my results have been all over the board. But sometimes, even the "mistakes" or where I "go wrong" results in an interesting print... which is what happened here. Same story~  image circa the 70's, originally a slide, transferred to a digital image & etched onto a copper plate. I think it was an interesting image to begin with... dad shooting a self portrait into the mirror with an old Pentax Honeywell film camera. Here are the results~


And again, printed with different ink & paper for a different feel~


Even though it didn't turn out the way I had planned, I thought it made for a really interesting image. 
Looking at the copper plate below, you can see how little the plate has etched.


 I would like to redo this plate & try again if I can fit it in this quarter!
Here's the original image~


I just realized I etched it backwards from the original!  :)

Sunday, May 2, 2010

Photo Etching the 70's

Yes,  I've had an extremely busy & productive week in the print studio! As you may know, I've been doing all beginning work/film tests on old family slides that have been transferred to digital images and have been using them as a starting point for photo etching. This is my brother, circa early 1970's~


Pretty cute, huh? 
Below, the etched plate... inked, wiped & ready to print~


Even though I had some film problems around the edges... I got the exposure, development & aquatint process right on, so I got a nice deep etch, which holds the ink well, translating into a nice rich print.


Have also been experimenting with different colored inks & printing on different paper~


This one was my favorite!

Testing... Testing...

Still experiencing a steep learning curve in Photo Etching! We've been testing two different films~ Zacryl, which picks up more gray tones & Imagon HD, which is a higher contrast film. These were my recent tests... first the Imagon~


It mainly picks up the most contrasty areas, and the midtones fade away. The darker splotch on the left is where the film didn't adhere properly to the copper plate & the acid leaked under the film & etched away.
Next, the Zacryl~


The Zacryl picks up much more of the midtones, which I like, but it can translate those midtones a bit darker than intended. I'm learning that this can be adjusted a bit in photo shop, before the transparency is printed... but I'm still working on this. There are so many place to go "wrong," from first adjusting tones & contrast in photoshop before printing a transparency, to proper film application on the copper plate, to exposure times, proper development and removal of areas of film, and finally to the etching and aquatinting! I imagine it could take quite a while to really get consistent results!
Just for fun, the original image... me & the old VW... a long, long time ago~


Saturday, April 17, 2010

Photo Etching~ The Good Stuff~ Take 2

Here are the results of my 2nd print... still a ways to go, but I really liked the way this one turned out. I am a little partial though, due to the subject matter... 'cause it's my mom! This picture was originally taken about 36 years ago, sometime in the early 70's by my dad using slide film & an old 35mm camera. I just recently got it printed & had a digital file made. I love this picture... mom barefoot & raking the yard! Even though we didn't have much compared to what everyone has these days, we had what we needed, and I am glad to have grown up this way. We had a very small house (my brother's room was the hallway!), but we had lots of open space... and dogs, cats, chickens, ducks, goats and a garden. As a kid... it felt like a little farm... and since there were no tract homes, just open space around... there were lots of places to run free & explore. But, I digress! Back to printmaking. So here's what the photo looked like after transferring from slide to digital to print:


Then~ etched, inked, wiped & ready to print~


And~ The Final Print!


While this technique is extremely labor intensive ( it took about 10 hours of work for the whole process to get the print of the van below, & the print of my mom shown here) I am really liking where this could go...

Friday, April 16, 2010

Photo Etching~ Getting to the Good Stuff!

I know, judging by the title for this post, you're all expecting to see great results here! Ha! Tricked ya! :) But we did begin learning how to etch actual photographs this week. Once I have had more practice, I can see where maybe I'd have some pretty cool results... but for now... well, you know. When I was back visiting family recently, I borrowed a few slides from my dad from "back in the old days." We had this cool old '58 VW bus... and mom & dad used to pack up us kids & the dogs & we'd go on these mini-adventures. Probably where I got my wandering tendencies & adventurous spirit! :) Anyhow, I thought it would be fun to etch some of these old memories... so I had the slides transferred to digital, put the image into photoshop, deleted all the color info, increased the contrast & printed it onto a transparency... and, well, you know the rest!


Since this is the first time I've ever done this, I cut myself some major slack here. Because even though there are places where I hadn't got the film applied properly (dark spots/air bubbles) and I don't know what happened to the front of the van (will find out monday)... I can actually tell what it is!


It's a start!!!

Wednesday, April 7, 2010

Photo Etching~ The Process

A week & 1/2 back into school, & boy am I ever busy! In order to squeeze as much learning in as I can during the short quarter ( the state budget cuts have cut about a week off our terms, in addition to tuition hikes~ nice!)... I am spending monday through friday in class or in the studio... about 40 hours per week for 2 classes... and then I work all day on saturdays. Sunday I rest!

Photo etching, a specialty printmaking course taught here only once a year, has proven to be interesting already, as I had assumed it would. There are so many different directions one could go w/ Printmaking... it almost mind boggling!  We are starting with learning the basics of photo etching before we go into photographic images.

So, whatcha do is, take your copper plate, prepare it as you would for any other etching process... then apply a light sensitive film to it (we're using Imagon.) Then you take objects & lay them on top of the plate & expose them to light... similar to the old black & white film technique. You know I love documenting the process, so here we go! Here's where we lay our prepared plate to expose.


I did 2 images, one where I simply placed items on top of the plate... and one where I used a vacuum technique for finer detail. The plates below have been exposed, developed & are now into the etching & aquatint process. (If you are now thoroughly intrigued~ hee hee~ and want to know more about aquatinting I do have a post on that too!)


After the lengthy aquatint process & the plates are cleaned, you are ready to print. The first one I did, I wasn't really happy with... but I'm showing it here anyhow because I really enjoy documenting the process & seeing where I started from & where I end up. So, I printed a few & will now recycle the plate for another project. Here's how it turned out: 


My idea was kinda "things that can save your butt in the wilderness..."
My other print below was an a random idea, but I liked the way it turned out much better than the first.
It's just a tea bag, with the tea emptied. With this process, I used a vacuum sealer when it was being exposed, which allows for greater detail, but this technique can only be used on very thin items.


Then I just played with some color a bit on the same plate... it gives it a much different feel.


So, that's it for now! We're learning more techniques this week, so with any luck will have some finished by next week!